

Creating comprehensive, accurate customer profiles in QuickBooks Online takes time. So it’s tempting to enter just the minimum information required to process transactions. But there are numerous benefits to including every possible detail that QuickBooks Online allows, and making sure those details are correct. For example:
- You can do deeper, more insightful searches.
- Your reports can be filtered by more criteria, making them more focused.
- Your marketing efforts can be more targeted.
- Your communication with customers will be more informed.
Importing Customer Files
If you have customer files in CSV, Excel, or Google Sheets format, you should be able to import them directly into QuickBooks Online. Click Sales in the toolbar, then Customers. In the upper right corner, click the down arrow next to New customer and select Import customers.
You can look at a sample file before you import CSV or Excel files. Your file must contain a header title for each column in the top row. Customer Name is the only required field, so don’t worry if your database isn’t completely filled in.
After you’ve browsed for and selected your data file, click Next to open the “mapping” page, where you’ll match the fields in your own file to QuickBooks Online fields, as shown in the image below:
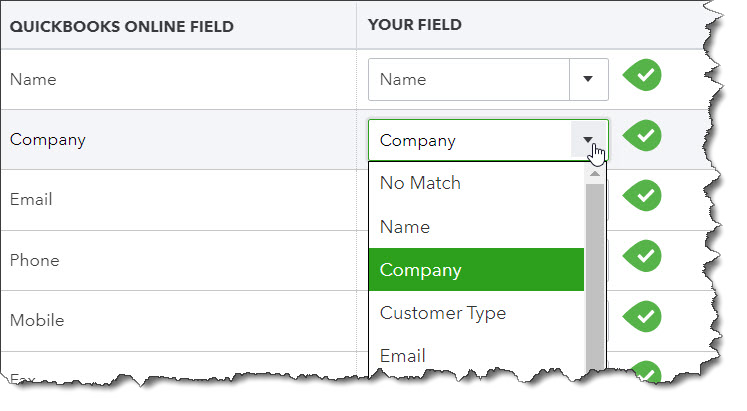
Click Next again to see your customer data in a table. If it looks OK, click Import to bring the file into QuickBooks Online.
You’ll connect directly to Google Sheets to import a customer file.
And you can import your email contacts from Outlook or Gmail after you’ve exported them from those applications as Excel or Google Sheets files.
Creating Customer Records Manually
If you don’t have an existing database of customers (or you don’t want to deal with the import process), you can enter the information manually using QuickBooks Online’s customer record templates. Return to Sales | Customers and click New customer in the upper right. A vertical panel slides out from the right side of the page containing labeled blank field for your customer data.
The only field that’s required to create and save a customer record is Customer display name. But you’re going to want to complete more fields. If you’re not sure about some things, or you get additional information later, you can always come back and edit the record. The icons in the upper right help you navigate quickly to other sections of the record.
Some of these fields are to be used for information that will appear automatically on invoices. If you specify, for example, what the customer’s default Primary payment method, Terms, and Sales form delivery options are, they will be automatically selected when you create a sales form, though you can change them on the fly.
You don’t have to complete every field. There are some, though, that must be filled out, such as:
- Tax rate,
- Tax exempt status, and
- Opening balance.
Viewing Your Completed Customer Records
Once you’ve completed and saved a record, it will show up in the Customers list, which appears as a table. The last column on this page, the Action column, provides links to all the actions you can take related to that customer, like Create sales receipt and Send reminder.
Click anywhere in the row to open the customer’s “homepage.” This contains the information you just entered plus related QuickBooks Online data that is displayed automatically. You click tabs to see lists of things like the customer’s Transactions, Statements and Customer Details. You can create new transactions from this page, too.
Designating Sub-Customers
You may have noticed a line at the bottom of the Name and contact section that reads Is a sub-customer. You’ll create sub-customer records if you want to “nest” a customer or job under a “parent” customer. If you’re a contractor, for example, you might want to set up different properties (like “Guest House”) as sub-customers and assign billable products and services to them. You can choose to have the billing go to the parent customer, of course, as pictured in the image below:

Answering Customers’ Questions
If you’re conscientious about creating comprehensive customer records, it will be easier to answer customers’ questions quickly. In fact, these pages will be helpful to you anytime you have to look up customer details. And as stated earlier, your search results and your reports will be more focused and insightful because of the filters you can apply.
Contact the office with questions about customer records or about any other elements of QuickBooks.